On to the camera. I got a Cannon Rebel and I’m EXCITED! The pictures are such better quality! The kids and husband were happy to model the night I got the camera. This is our telephone pole pile and some of our spools. 🙂


Living in the Wyoming countryside

On to the camera. I got a Cannon Rebel and I’m EXCITED! The pictures are such better quality! The kids and husband were happy to model the night I got the camera. This is our telephone pole pile and some of our spools. 🙂

Life is tough in my household. You can’t eat anything without my demands following you. Such is the life for kids who like apples. I love buying them apples but they had best not throw that apple core away. I require the seeds from it first! Plus, the chickens like the cores so they’d best not throw them away regardless.

Apple seeds need stratified before they will germinate. I cold stratify my seeds in the refrigerator until they have just barely sprouted. Ok, not completely true. I once forgot I had seeds in there and they were leafed out before I planted them. They did not make it. Best to get them when they have just barely started.

Whoo that picture is bad. I need a better camera. Anyway, you can barely see the leaves there. I believe these were fuji apple seeds and my very first stratification attempt. I remember they exist a lot better now!
So what I do is easy. I take out the seeds, put them on a wet paper towel and then put them into a cup that I have labeled with the name of the apple I took them from. I have all the cups stacked and put in a ziploc baggie. This is all kept in the veggie drawer of my refrigerator. Every once in awhile I take them out and check to see if any have sprouted.


If not, I put them back in the fridge. If they have I plant them in a plastic cup.
I planted 8 germinated apple seeds a week ago and today they look like this:
Growing quite well!

Now I am also trying to grow rootstock from crab apples I found on a tree in town. The same basic process as regular apples except harvesting these seeds requires more work.


So far none of them have germinated. They had been dried up hanging on the tree for most of the winter so we shall see what happens.
I also collected various locust seed pods on my daily walks with my parents. We all take our lunch break and walk. They have become quite used to my odd veering off and shoving of various debri into my coat pockets.
To germinate the locust seeds I simply put them in a small “greenhouse” like container with a bit of soil.

I have germinated many, many seeds this way. It also works. This container has seen many gardens!
The locust seeds did not need to be cold stratified and germinated in just a few days. I have 2 surviving seedlings that are growing quite happily in a windowsill right now.
I believe I only have a few survivors as the seeds had also been collected from the ground in the middle of winter. I did not pre-think most of these projects.

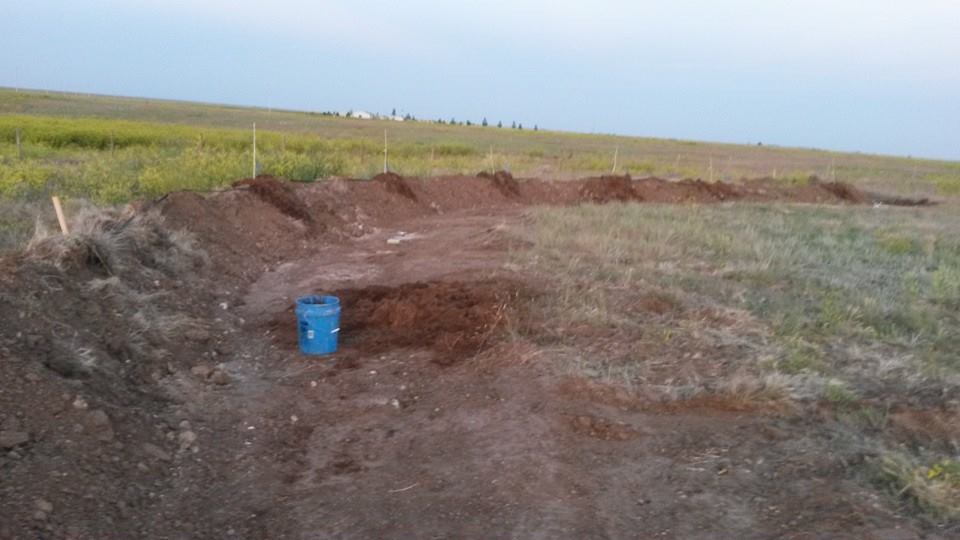
Krater Garden finished construction

Same krater garden planted and growing.
So what is a krater garden?
Sepp Holzer, The “Rebel Farmer” from Austria, developed the krater garden after a trip to Siberia. The crater garden is, well….a crater, with terraced sides. Water collects in the bottom of the crater and feeds the plants grown on the terraces. Krater gardens also create micro-climates in which plants that cannot normally be grown in a particular zone may thrive.
Why would I want to make a krater garden?
Well, why not? My land is pretty flat and pretty dead. I’m in a High, dry and windy area. I need to take advantage of wind protection and water harvesting opportunities. I also like the idea of increasing the square footage of my 40 acre property.
The plans:
Initially I was going to go big, really big. However, big earth works come with big price tags, also, permits. So after speaking with the local water permit person I was granted permission to do a small krater garden without requiring a permit. I had the honor of being the first person in Wyoming to mention krater gardens and I had to send a lot of krater garden information to explain what I was talking about.
http://www.elementalecosystems.com/phone/krater-gardens.html
http://www.permies.com/t/37563/sepp-holzer/Crater-Gardens
So the plan is to use the bucket of our small tractor to dig a krater garden that is no more than 3 feet deep and 14′ in diameter. Of course, that is the water harvesting portion of it. I didn’t hear them say I couldn’t do the terraces larger so I’m going with as big as I can with my limited earth moving equipment. You might be wondering how we came upon 3′ and 14′ in size. Well, the simple answer is that I’d dug a duck pond with the tractor before and from that experience knew that 3′ was as good as I was getting. The duck pond is also 14′ in diameter so it seemed like a good idea to get that approved since I’d dug it before I was quite aware of water law and regulation.
It is winter here right now but that is just fine as the planning stage is in full force. I need to pick the location for this garden and plan the plantings. I’ve been making the front of the house the experimental area, so now I need to pick which part will be cratered. If the crater garden does well I may expand the concept to the rest of the property. I am right now imagining 40 acres pock marked with 3′ deep craters.
I will most assuredly keep everyone updated with my krater garden progress.
Thanks again to Zach Weiss for granting me permission to use his photographs. Be sure to check him out! (http://www.elementalecosystems.com/crater-gardens.html)
PALLETS:
Verdict: Failure for onions. Might be a triumph with lettuce.


I grew onions in pallets this year and it was only mildly successful. I had ants move into one, which was partly good and partly horrible. They were army ants and I liked having them there as I saw them eat quite a few grubs. I did not like having them there because they swarmed whenever I watered or weeded. Unpleasant. I do think the idea of pallets is a good one, perhaps my technique was just off. I had to put more dirt in halfway through the season as it settled quite a lot. Keeping the dirt moist was also a problem. I mulched the rows with straw, but the pallets were thin and thus the dirt layer was as well. It just dried out pretty quickly. The onions I pulled in the fall would be considered pearls. I decided to save them for replanting this spring.
So would I do this again, maybe, but not for onions. I think this would work well with lettuce but that is about it.
RAISED BED:
Verdit: Triumph

Squash planted around watering hole

Asparagus (above and below)

Our property came with a pile of old wooden fencing. I’ve used it here and there for various things and this raised bed is one of them. It is about a foot high, and 10 feet square. I planted asparagus, pumpkins and zucchini into this bed. For the pumpkin and zucchini I put a big hole in the middle of the bed for watering and planted the seeds around it. It worked pretty well. Also around the entire perimeter I planted marigolds. They got HUGE!


I really have nothing bad to say about my raised bed. Everything in it grew large and fast. I had more zucchini than I knew what to do with. It worked great! In 2015 I’m going to plant my tomatoes and peppers into the raised bed instead of the straw bales.
STRAW BALES:
Verdict: Failure

Pumpkin plants growing in straw bale

Mushrooms growing out of straw bale

This picture sums up my straw bale experience. I fertilized with chicken poop for about 3 weeks before planting. I also added dirt into the planting hole and mulched with extra straw over the top after planting. Nothing did well in the bales. The straw bales were planted out weeks before my raised bed but the one pumpkin I planted in the bale never produced while I had several pumpkins from the raised bed plants. I had 4 bales. The pictured bale had bell pepper plants in it. I had 2 with tomatoes and one with squash. Again, nothing did well. I did have mushrooms popping out, which I was told meant my bale was decomposing like it was supposed to. It just didn’t work out. I would not do this again. The only benefit is that I had nicely fertilized straw to mulch my other beds with in the fall.

Fertilizing straw bales.
TIRES:
Verdict: Undecided


corn and beans


peas and sunflowers
Tires, my favorite material. I had one large, square, raised bed in the middle of my kitchen garden. On two sides I had two tires set up. I planted potatoes in one, carrots in another, beans and corn in another and sunflowers and peas in the last. The dirt was a mixture of my clay soil, horse manure compost, peat moss and straw mulch. The potatoes did very poorly. I had nothing eatable from that. BUT I just planted store bought potatoes which may be the reason for that. The carrots also did poorly but I know I did that. When I did the initial watering of the carrot tire it washed all the seeds to the very side of tire. Big mistake. So they never got very large. The peas did well and I did get some 4′ sunflowers as well. I got maybe 2 green beans and no corn. They grew up tall but nothing ever happened with them. I did plant peas and beans in my swales and they did much better there.


I will use tires again I think. I’ll try potatoes in them again. The other tires will be used for spreading herbs though. I’ll plant my veggies out in the berms, it did better there.
BROADCAST SEWING ON BERMS- LATE SEASON:
Verdict: Triumph

In late July I bought a ton of different seeds and simply threw them onto my berms. Not everything did well but most of it did amazing. I’m a big fan of broadcast sewing now!
 Caragana parent bush in established tree line.

Sapling as seen in hole without mulch. This was taken the day we watered them.

Son helping me insert watering wine bottles into plant holes.

Plant covered in mulch and growing well.


Pictures of the bushes now. Showing some green but chewed up by rabbits.
If you want to get some nitrogen fixing Caragana seeds
and give them a try I find them prolific and a joy to have around. The bees love them as well.
On another plus side, I now have well fertilized holes on my property thanks to this experiment and rabbits.


I was amazed at how small the boxes were, and a little wary. I began unboxing and soaking my trees immediately.

Please excuse the mish mash of detritus in this picture. This is my unboxed tree showing some leaf budding. I went about painting the trees white while they soaked. It was July and I did not want my new trees to get sun burn.

All painted! You can see that I have a lot of shredded paper in there with my plants. I wasn’t going to be able to plant them all in one day, as I had 36 and was planting alone, so I “hilled” them in their containers.

Here is a happily planted and mulched tree looking very much like a stick. I just knew it would grow into a beauty! You can also see my hand painted stake used to identify the tree and plan out the planting.
It took some time but I managed to get one full berm planted and mulched. I left spaces in some spots for cherry trees, which had been sold out when I’d placed my order. The mulch is extremely moldy straw that has been sitting in a corner of our property since before we moved in.

I was extremely happy to find that within weeks I had some beautiful leafing. I was concerned about two of my trees though as they were not showing leaves. I hoped they made it. Thankfully they did, they just took a lot longer to adjust than the others.

Now look at this, a very happy boy helping me show the height and growth of our trees. This tree just shot out quite impressively. It is a Superior Plum tree, standard sized. My son happily walked the berm line with me nightly, talking about how excited he was to pick fruit off of the trees. I don’t believe he realized how long he’d be waiting though.

I did have some issues though. I am not positive but I believe we had some blight. You can see the black leaves in this picture. I took shears and cut all the black off, bleaching between prunings, and then burned the clippings. I hope I do not see it this year.


After I planted the trees I threw out a great variety of herb, salad, vegetable and flower seeds. It was late in the season but I had some amazing lettuce growth. This lettuce reached 3 feet in diameter with leaves bigger than my head. I had poppies and nasturtium do well. I also had a ton of various lettuces.


I cut some bushes down and threw all of the branches into my swales.

Most of the berm produce went to the poultry. I did save what seeds I could for this springs planting. The kids loved bringing the poultry goodies.

I find kids will try about anything if they can pick it. Though that doesn’t mean they’ll like it, as seen here:

We had quite a few beets grow and the turnips grew absolutely massive in size. My son happily washed and bit into every plant he picked. He thought the beet was sweet but he had quite an attack when he bit into a turnip. I licked it and understood why, it was incredibly spicy. The chickens adored those turnips though.
 (excuse the mattress behind the kids in this picture. It is our old bed, which I stripped down to the frame and intend to use as a trellis this spring. You can see the stripped frame in one of the pictures below.)

I did prune, not much, but a bit. My Son was anxious to help me with that job. Here he is cutting some suckers off of the bottom of the tree. Great view of one of my tree markers as well. Superior is the type of fruit, Then you can see Plum written under it and the S stands for Standard sized root stock. So this will be a standard sized superior plum tree.


Then it was fall and time to protect my trees. I ended up transplanting my grapes onto the berms, under the standard sized fruit trees. Where I planted a grape I used cement to hold down the mulch. It has worked quite well so far. I used the walls of tires to hold the mulch down around my black walnut trees. That has also been a successful method of holding mulch. We get some impressively fierce winds out here, 40-50mph is normal for us.
Now to wait and see what happens this spring. Did all of my trees survive? I am hopeful. The berms and swales did an impressive job of collecting snow so I believe my trees have received a decent amount of water. It has been a rather dry winter so far. We still have snow collected in the swales and in some of the water diversion ditches so I would say the earthworks did the trick.
