Country Kitchen Update- Almost done!

Old Kitchen

The kitchen remodel has been fairly slow. Removing walls, rewiring and plumbing and repairing walls has been extremely time consuming. Above is what this particular wall of cabinets looked like before I finally figured out what to do to finish the top cabinets with. There was a large amount of blank space on both sides of the top cabinets before.

IMG_4446

Now there is a beautiful coffee and wine rack on either side of the old cabinets. I made them out of 1×12 boards and sweat. I think they look fabulous!

Coffee Bar

The wall color pops on the inside of each new cabinet extension.

Wine Rack

We always need wine storage so this is a great way of getting it!

New Kitchen

We did the same counter top on both sides but kept the wood planking to the back splash only on this side.The toe kick hasn’t been touched yet as we are going to redo the floor first.

The top of these cabinets was made into a shelf used to display…well I haven’t worked that all out yet. It looks half way decent now at least.

IMG_4445

That beautiful sign makes the kitchen sparkle.

Now to redo the island. That is going to be the biggest task so far!

Country Kitchen Remodel Update

I’ve been remodeling the kitchen since October. It’s the project that never ends. Still, I’ve moved walls and plumbing. I’ve been helped with (and figured out) electrical. We’ve painted and hammered a ton. It’s been a seven months. Here is what’s been happening:

IMG_3931

This is the wall of cabinets that shouldn’t exist, as I was determined to rip out that wall. Now it’s a wall of awful red cabinets that need stripped and re-painted. It’s a work in progress, as you can see.

IMG_3920

This cabinet was at an angle on the now gone wall. I moved it, ripped out the drawer. Took off the door. Put a plank backing on it and now, it’s a perfect fit for my kitchen aid and finishes off this wall nicely!

IMG_3916

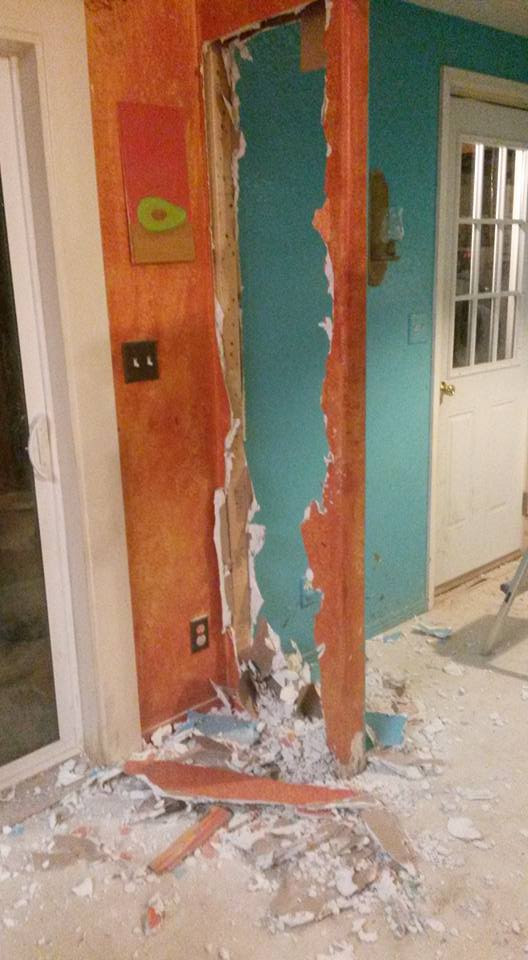
This is the other side of the awful red cabinet wall. I had knocked a massive hole in it before realizing it couldn’t be removed. So it’s all patched up. Needs sanded, textured and painted still. Always something!

IMG_3930

Finally stained the trash drawer. I like it much better like that.

IMG_3922

IMG_3921

I can finally consider the pantry completely finished after building these great wooden doors and planking the side wall of it. I love how it all turned out!

IMG_3912

The entire house has been re-arranged. Pre- wall removal this was the kids playroom. It is now the dining room. It’s been painted and decorated and I’m in love with how it turned out!

IMG_3928

I was extremely happy to find these peacock plates at home goods

IMG_3914

Herbs are sprouting nicely in my chicken feeder herb garden.

IMG_3915

The hanging scale is to die for. Functional as well. I’ve been weighing animal feed in it. I love the column I found at an antique store and the peppercorn plant is doing great in it’s greenhouse.

IMG_3929

Other things happening are because of the big household rearrange. We moved all of the main spaces in the house around.

IMG_3918

This space in the new playroom was begging to be a learning center. Now it is! I built that lovely table and benches and I couldn’t be more happy with how this space has turned out!

IMG_3927

Now that our living room is near the fireplace the empty, ugly space had to have something done to it. This is two tails from our peacocks and it’s marvelous!


That’s it for now. Still to do is finishing the cabinets off, removing the current island, installing new flooring and building a new island. Worlds of changes to come!


Country kitchen remodel stage 1 of 5 in process

Methods to take apart pallets

I was driving home from work recently when my mind finally figured out a problem in our kitchen design. The trash can was the problem. We had no other place to put it in the kitchen. At least we thought we didn’t. Last year I’d removed the drawers from one of our base cabinets. They were falling apart and their location made them a haven for mice. We’ve since fixed the mouse problem by purchasing this product and filling all the small holes and cracks in the house with it. We seriously haven’t seen a mouse since we did it. Life saver!

Anyway, so I had this blank base cabinet I was never getting around to turning into a pot rack. The trash fit nicely into it. With the trash moved I could finally take down a pointless wall that divided the kitchen from the laundry room. The kids enjoyed helping, and with hammers and eye protection passed around that wall came down. It did an amazing job opening up the space. It feels so much larger now. However, I had a damaged wall that I was going to have to do something with. We need somewhere to put our coats and boots. That has always been a problem in our household as the coats always seem to collect on the dining room table. So I planned to make mudroom cubbies. However, we liked the open feel  so much I couldn’t see ruining it with cubbies. Thus we are doing a simple coat rack, a movable bench, boot trays and some wire baskets nailed to the wall. It was decided we would plank the wall from the kitchen into the laundry room to make the rooms flow better, as they are currently different colors. Once that was decided my mind took off and now we have a 5 stage remodel project that is going to change everything.

Stage 1- planking the wall, beautifying current cabinets installed on planked wall, new faucet and sink, open shelves to replace 1 wall cabinet.

Stage 2- moving the fridge and building a pantry.

Stage 3- remove cabinets, wall, and old island and build large island in it’s place.

Stage 4- lighting and fixing the ceiling as we currently have 2 recessed fluorescent lights.

Stage 5- fixing the flooring throughout.

So far in stage 1 I have boxed in the top of the wall cabinets that will remain. I always hated the space above them as it wasn’t enough to do anything with. I removed the wall cabinet and made and installed floating shelves. I’ve hung 3 coat racks in the laundry room. Seems excessive but we had a lot of wasted space in there so….. why not. I’ve ordered the sink and faucet and the Ardex required to cement coat our current counter tops. I’m still looking for planking wood. I think I want to use old fence panels and a local fencing company said they would call me when they had some I could take. I also need to purchase a bench and the boot trays I’ve decided on. Slow going as I am working full time, a mom and a farmer. Going all the same!

Here are a few pics of the wall demo. As you can see I got a bit nuts when we moved in and painted the kitchen a CRAZY mixture of reds, yellows and oranges. My cabinets are red….it’s horrible.

Wall demo  Wall gone 

IMG_2570

This is the coat rack getting screwed in.


This post contains an affiliate link.