Country kitchen remodel stage 1 of 5 in process

Methods to take apart pallets

I was driving home from work recently when my mind finally figured out a problem in our kitchen design. The trash can was the problem. We had no other place to put it in the kitchen. At least we thought we didn’t. Last year I’d removed the drawers from one of our base cabinets. They were falling apart and their location made them a haven for mice. We’ve since fixed the mouse problem by purchasing this product and filling all the small holes and cracks in the house with it. We seriously haven’t seen a mouse since we did it. Life saver!

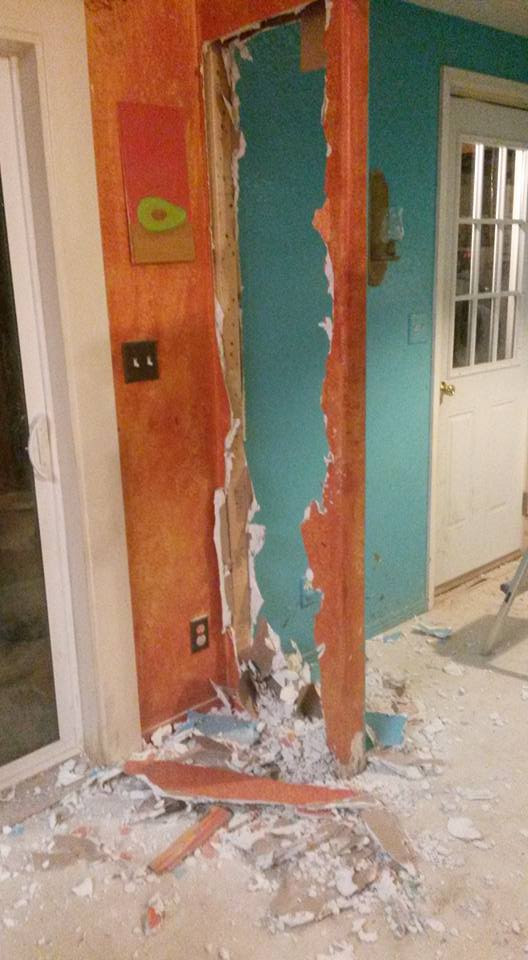
Anyway, so I had this blank base cabinet I was never getting around to turning into a pot rack. The trash fit nicely into it. With the trash moved I could finally take down a pointless wall that divided the kitchen from the laundry room. The kids enjoyed helping, and with hammers and eye protection passed around that wall came down. It did an amazing job opening up the space. It feels so much larger now. However, I had a damaged wall that I was going to have to do something with. We need somewhere to put our coats and boots. That has always been a problem in our household as the coats always seem to collect on the dining room table. So I planned to make mudroom cubbies. However, we liked the open feel  so much I couldn’t see ruining it with cubbies. Thus we are doing a simple coat rack, a movable bench, boot trays and some wire baskets nailed to the wall. It was decided we would plank the wall from the kitchen into the laundry room to make the rooms flow better, as they are currently different colors. Once that was decided my mind took off and now we have a 5 stage remodel project that is going to change everything.

Stage 1- planking the wall, beautifying current cabinets installed on planked wall, new faucet and sink, open shelves to replace 1 wall cabinet.

Stage 2- moving the fridge and building a pantry.

Stage 3- remove cabinets, wall, and old island and build large island in it’s place.

Stage 4- lighting and fixing the ceiling as we currently have 2 recessed fluorescent lights.

Stage 5- fixing the flooring throughout.

So far in stage 1 I have boxed in the top of the wall cabinets that will remain. I always hated the space above them as it wasn’t enough to do anything with. I removed the wall cabinet and made and installed floating shelves. I’ve hung 3 coat racks in the laundry room. Seems excessive but we had a lot of wasted space in there so….. why not. I’ve ordered the sink and faucet and the Ardex required to cement coat our current counter tops. I’m still looking for planking wood. I think I want to use old fence panels and a local fencing company said they would call me when they had some I could take. I also need to purchase a bench and the boot trays I’ve decided on. Slow going as I am working full time, a mom and a farmer. Going all the same!

Here are a few pics of the wall demo. As you can see I got a bit nuts when we moved in and painted the kitchen a CRAZY mixture of reds, yellows and oranges. My cabinets are red….it’s horrible.

Wall demo  Wall gone 

IMG_2570

This is the coat rack getting screwed in.


This post contains an affiliate link.


DIY Playground update

a diy playground

I really like this picture. The tires that form the back wall of the tire sandbox are bursting with greens (tomatoes and weeds mostly), everything is shiny and bright and the kids are happy as clams. What’s not to love.

IMG_1890 - Copy IMG_1889 - Copy

Things are growing exceptionally well in those tires. I put a tomato in each. Daughter helpfully weeded 2 of them out. I also have some green onions thrown in here and there and mint growing in a bottom tire.

IMG_1888 IMG_1886

So we finally moved the bucket pulley closer to the sandbox and added hooks to help with toy storage. Do the kids use them? Nope. Daughter is only trying to get the shovel off, she couldn’t btw. Brother had to help her. That clothes basket is what we have been using to hold all of their toys and still use to hold some of them. It is supposed to be hanging on the post but…..life.

Tether Ball being cementedIMG_2157

I also completed the tether-ball, which is a favorite of visiting nieces and nephews.


I ruined the balance beam as well. I had to move the dirt filled tires so we could till for the clover planting. I need to refill the tires and just haven’t got around to it yet. Eventually!

IMG_2158

The clover is coming up spectacularly though!

Top Bar Bee Hive Construction

Hive

I found this Instructable last winter and knew I had to make it myself. It seemed easy and fairly inexpensive. It took some time for me to get around to it but here it is, my beehive.


I started by cutting a plastic water barrel in half. I then washed it as well as possible.

IMG_1726 IMG_1728 IMG_1729

Then I measured and made a frame for it from 2×4’s.

IMG_1733

I put the barrel in the frame and nailed it into place, which resulted in some major thumb whacking and a band-aid applied by Son.

IMG_1737 IMG_1738 IMG_1741 IMG_1742

Don’t worry, Daughter has a toy hammer she’s “helping” with.

Then I screwed on the legs.

IMG_1745

It turned out surprisingly tall which then required some bracing lower on the legs.

We caulked the gaps between the barrel and the frame with regular latex caulk.

Next I built the roofs out of 2×4’s and metal sheeting that we already had on hand.

IMG_2059 IMG_2058 IMG_2057

I cut a small circle of hardware cloth and glued it over the entrance to the hive. I didn’t want anything bigger than a bug taking up residence in these things.

Then we cut the bars and ran a line of wax down the middle of each to guide the bees.

Lastly we coated the entire inside of the hives with beeswax and lemongrass oil. We hope the oil helps attract a swarm.

The original plan was to keep the hives inside our large lean-to. However, I now believe I am going to build an addition to the lean-to specifically for the hives. That will follow in a later post.

IMG_2115

Wine Bottle Hot Box

Wine Bottle Hot Box Script

We have been saving wine bottles for awhile. We have the benefit of other people’s bottles as well. Husband and I discussed various ways to make a hot box from wine bottles and the results are pretty nice if I do say so myself. We scavenged another wooden trough type structure from the local Kubota. Husband drilled holes in it and bam, hot box. We will be testing this as time goes on. Hot peppers are the current residents of the hot box.

IMG_2069 IMG_2070 IMG_2073 IMG_2074 IMG_2076 IMG_2077 IMG_2078 IMG_2082 IMG_2083 IMG_2085 IMG_2089

A little bit about how this works and why you would want it:

The sun heats up the air inside of the wine bottles. The hot air then pushes through the neck of the bottle and into the soil, increasing soil temperature. This is a good way to increase your growing zone. We chose to put hot peppers in the hot box because of their love for hot soils. I hope to see them take off soon!

Spool cars

Spool Cars

We went to our electrical company and saved as many spools from the fire as we could. We chose 3 different sizes for our playground. The first thing we did was decide how to keep them from rolling about, as much as the kids loved that. My initial idea was burying them a bit but Husband was much smarter and suggested cutting them. So cut them we did.

20150313_173954 20150313_173947

20150314_112418 20150314_112415

The kids enjoyed painting, for a few minutes at least.

20150314_111912 20150314_111912(0) 20150314_111903

Hubby did a great job putting the steering wheel on.

20150316_175615

The results are great!

IMG_1614 IMG_1613 IMG_1612

Planter Box Porch Railing

PORCH RAILING PLANTER BOX


Before
Before
After
After

Our back porch had a trek deck railing around it. This railing was not particularly sturdy. The posts were cracked and it was beginning to lean precariously. Once the end post snapped I finally took action and removed the railing completely. Then I had to decide how to replace it. I finally decided on making a planter box railing. I thought this would be much sturdier and much more attractive. Plus I liked the thought of having my herbs closer to the kitchen (which is right inside the door to deck).

What to make that planter box out of was a challenge. I originally settled on 1″x12′ boards. However, I couldn’t find them in any of our stores. Ordering them in was also quite expensive. Prohibitively so. Around this time my husband began taking the cross pieces of telephone lines apart.

Here are a few pics of the materials used for the box. They are from telephone poles. My husband stripped them down and they worked just great!

IMG_0687

Here were these sturdy and FREE boards in need of a use. I immediately appropriated them for the planter box.

IMG_0746

I had to start by leveling out the lawn area.

IMG_0741

Our great pyrenees is a horrid fence jumper and we finally resorted to chaining him up to keep him in the yard. The area he was chained to was this lawn area and it quickly became a dirt and mud pit as he stripped it of vegetation. We finally electrified the fence and cured our GP of his fence jumping ways. We were all happy not to have to chain him any longer and now I could fix up the lawn area. I started with the leveling and then seeded it with grass. The seed took wonderfully and we had a lush grass lawn. Then came the realization that we were going to have to mow it and our only mower was the tractor. Grass was not going to work. So we tilled and planted clover. You can see that in my Yard Reboot post.

IMG_0744

Back to this railing. I leveled the area, trenched a level area for the boards and pounded rebar into the already drilled holes.

IMG_0928

I then started stacking these wooden boards, cutting and drilling where necessary. Unfortunately it turned out we did not have enough to go the full 5′ required for an appropriate height railing. So I made the board box level with the porch. I bought pig panels and 2×4’s to make a trellis/railing instead. Then it was filled up and planted with herbs.

IMG_1501IMG_1657

IMG_1720 IMG_1681

Oh, can’t forget the kiwi vine plan. In the corner of the box I installed a wood post and planted the kiwi vine right next to it. I’ve strung wire from the pole to the house and I am looking forward to a kiwi vine shade barrier.

IMG_1725

That barrier is obviously years in the making.

We aren’t completely done yet though. One side of the porch is being extended and made into an outdoor kitchen and I still have some work on the railing to do, such as painting and finishing off the top with a nice 1×2 board.