Adjusting Driveway Water Catchment

IMG_2722

If you’ve been following our progress you are probably aware of our driveway problems. Our driveway turns into a flooded, muddy, impassable mess every time a drop of water hits it. We get so much standing water on our driveway the ducks move out and swim on it.

Last year we used the tractor blade to make a ditch on one side of the driveway and dug drainage ponds in 2 spots on our driveway. One very large one to catch garage water and one after our treeline to drain the driveway. Neither of these were large enough to do what they needed to do this spring. Of course, it was an unusually wet spring. Still, we need to prep for more water!

IMG_2739

Thankfully we have our new, beautiful excavator to put to work. Husband (and the stray kid) has been busy ditching on both sides of the driveway and deepening the tree line drainage pond. That pond is quite deep now and I was quite happy as I really really needed to plant the bamboo I’d bought during the winter. I really didn’t want to bring it into the house for another winter and it had been hanging out in a pot on the porch all year. So I used the excavator to dig a largish hole, filled it with biochar and compost and planted the bamboo. Then I took a seed mix (dry land pasture grass, alfalfa, sainfoin, nitro-radish and winter barley) and spread it out in the new ditches and around the bamboo and “pond”. I’m hoping this helps stabilize it from erosion. The bamboo should also help with erosion.

IMG_2735

The kids have been loving this deep hole and I can’t seem to stop them from grabbing their shovels and heading out to adventure in it. A close eye will have to be kept on the little stinkers come rainfall.

IMG_2723

IMG_2717
My lovely car is such a farm truck!

If we need to expand this pond we will expand it northward. The trenches are quite deep and I’m excited to see how they work. All dirt from the trenches was put onto the driveway.


So, we shall see.

Daughter’s Fairy Tale/Princess Room

Castle mural

Daughter’s room was a real labor of love. I will not deny that I was blissful about having a daughter. I have an amazing relationship with my mother, who helped in the muraling of both Daughter and Son’s rooms. I want that relationship with my own daughter. So far she’s far too much like me and likes her Daddy better. Life!

This is a peak at her room when she was a baby. It is now nothing but an excellent walk in closet for both children as Daughter sleeps in Son’s room. When they don’t wish to share anymore she’ll be moved back.

changing table

You know from Son’s room that I’m a fan of changing tables. Unfortunately this mobile was far too long and was ripped down by Daughter pretty early on.

close up of castle

This castle. It is so much more magnificent in person.

closet crib side

There is a knight in shining armor but I will let daughter decide if it’s a female or male. Also, I had a mane and tail on the pegasus but I hated it so painted over it and just haven’t bothered to put a new one on.

peacock done

Obviously no daughter of mine could live without a life sized peacock on their wall.

sparkle floor

Also, sparkly floors.

tree

My mother painted this tree and it looks AMAZING. I am not very good at people so I asked her to drawn the fairy and owl, which she did amazingly. Owls are a bit of an inside joke here as we get them quite often and they always kill our birds.


Current use pics:

IMG_2706

IMG_2707

Sons Ocean Bedroom

shark crib

fish dog.

Coomassie Blue was NOT happy about the baby, though he’s adjusted quite well now that copious amounts of food are dropped on the floor for him.

growth chart

MUST DO changing table.

octopus

turtle anchor

I like to paint. I’m not much of an original artist though, more of a copier. So when we found out we were going to have a baby I settled on an ocean themed room right away. If it was a boy, sharks and pirates, a girl would get mermaids and dolphins. We obviously had a boy and I’m very happy with how his cartooney ocean room came out. All of the murals were painted with basic acrylic paint. The changing table is something I’d recommend to anyone. Having that mobile and mirror really made changing easier. An occupied baby is not a baby that is going to resist changing time. Of course, Son isn’t a baby anymore. He’s 4. His murals are unchanged but his room layout has changed a bit. Instead of a crib he has a loft bed with slide. Instead of having his dresser in his room he has his sister. It’s worked out just fine.

Current use pics of the room being vacuumed:

IMG_2708

IMG_2710

IMG_2711

Kitchen Remodel Stage 1- DIY Concrete Counters with a New Sink and Faucet

Kitchen Remodel Stage 1- Concrete Counter

The kitchen remodel is coming along slowly but surely. Almost done with stage 1. All that is left is painting the base cabinets and the cabinet doors. The game changers, for me, were the counters and sink.  Our old sink and counter looked like this:

Old sick and counter

It was 6″ deep and the faucet barely came 2″ above that. Can you imagine how difficult it was to fill a simple bucket in that thing. Horrid! The counters are laminate. They had this horrible maroon tile back splash and the tile was on the counter edge. Removing that tile and putting molding on the edge made things look better immediately.

Originally I was going to router a 1×2 board for the front edge of the counters. However, boards aren’t 1×2 in big box stores. They are 1 1/2 or 2 1/2. I didn’t want to have to rip the boards I wanted down to size so I went in search of a different solution. This molding was in the cut bin of Home Depot. It is the exact right size and doesn’t need routering as it already has a rounded edge. Ideal!

Prepping for new counter

Next I removed the sink. This was a big deal for us as it meant no dishwasher and our bathroom sinks are just as teeny tiny as this kitchen one. Basically we’ve been using paper plates and the grill for a few days.

Removing sink

Very simple to do but did require a crowbar as that sink was glued down really really well.

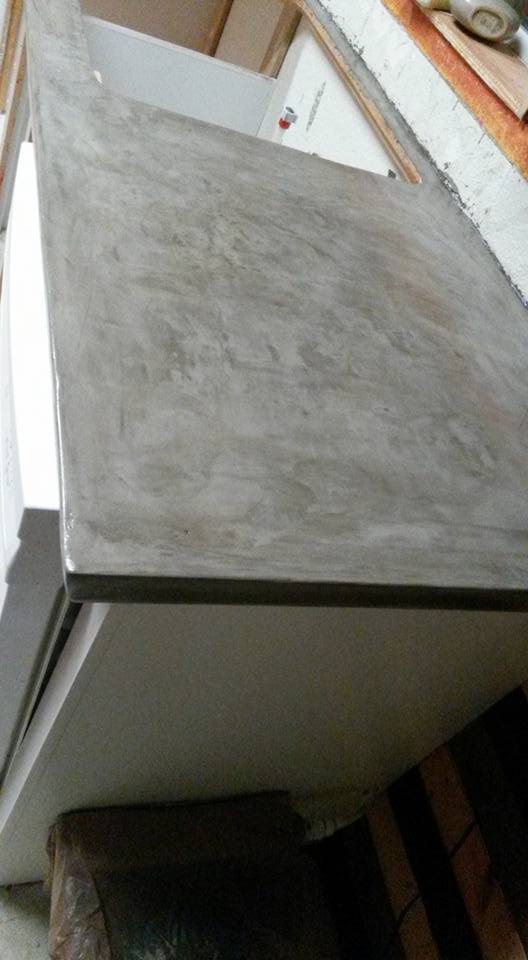
Then I started the cement overlay on the counters. I read a million tutorials on how to do it so I felt confident. I sanded the laminate, mixed my Henry’swith a 1:1 ratio and plopped a glob on to start smearing. Wow. No one told me how anxious that could make a person. It didn’t seem to be sticking all that well to the laminate and I was having SERIOUS doubts about this decision. However, I persevered and did 3 coats.

Henry's First Coat

First Full Coat of Henry's

Look at how terrible that looks! What a nerve wracking first coat!

I did all 3 coats of cement on Sunday and Monday night after work I set about sanding them smooth (by hand, as I really didn’t want all that dust getting blown about) and sealing them. We simply used a high gloss sealant we bought at Home Depot. My sealant is not labeled food safe. Cheng Concrete Sealer is supposed to be food safe. I simply didn’t want to pay that much. Yes, I’m that cheap. Plus I wasn’t sure how this was going to go down so…… I don’t regret my decision (so far). I did 6 coats of sealant.

Cement counters

I have a plastic bag over the automatic dog waterer so it would stay marginally clean while we were doing this. I have caught 2 of our dogs licking the bag. Bucket of water right next to it but they still want that auto-waterer. I think it gives them that fresh toilet water feel. Also, anyone who has multiple dogs should do this. It has changed our lives. You have no idea how often we were cleaning and changing the water on our old 5 gallon waterer. I can’t remember if I’ve linked the one we have before but here it is. Also, it’s hooked into the water supply to the sink. We’ve had it about 2 years now and I’ll never go back!!!!! I don’t think our dogs want to go back either.

Automatic Dog Dish

As you can see we did not put the “back splash” boards up until after the counter was completed. The back splash boards were premium boards I put extra poly on. There is a slight gap that we are debating on. I think we may put a metal strip up as extra water protection for the wall and wood but we haven’t made up our minds yet.

My dad came and helped me install the new sink. I can be fairly handy after training (my Dad trains me usually) but I was nervous about this plumbing job. Probably because the last time I did any plumbing it resulted in leaks and mold in the master bath. We no longer have a bath tub in there thanks to me.

Wood Packsplash, Cement Counters, Stainless sink and faucet

I have started the slide-out trash can area. The floor is in it and I have the bottom drawer pull screwed into the wall. Now I just need to make the box for the trash can and we’ll be good to go there.

Industrial Trash Can

I made a chicken wire shade for the new pendant light and hung it up with a Vintage bulb. I’m not sold on what I did with the rope. May change later.

Chicken Wire Pendant Light

I made this spice rack ages ago to hide the hole I made in the front of the cabinets in order to replace the old microwave.

DIY Spice Rack

I have a partial wall that needs painted, and of course the cabinets and cabinet doors. I may wait on the partial wall until I’ve torn down the part connecting it to the wall I’m removing. I’m undecided as of yet.

Almost Complete Kitchen

So take a look at a few before and afters. Obviously this is after I ripped the wall and the cabinet down but before I’d really put anything up. The tear down wasn’t particularly planned so pics weren’t at the front of my mind at the time, just hammering.

Before 1

Before 2

Open shelves

Farm Fresh

A huge improvement don’t you think. I particularly like my tomato display, which will be canned this weekend.


This post contains affiliate links.

Review: 2012 Oveja Negra Carbenet Franc Carmenere and Gruyere Cheese

IMG_2578

Wine:

2012  Oveja Negra Carbenet Franc Carmenere                    $8.99

[From Winemakers Web Page] Wine Makers Notes: Deep fruit characters dominate, with red cherries and soft touches of raspberries against a black fruit background complemented with some tabacco and cassis notes. Firm yet smooth on the palate, this wine displays a juicy, refreshing mouthfeel that reveal elegant hints of cedar and bitter chocolate that lead to more fruity characters that appear on the finish. Cellaring potential: drink now through 2+ years

IMG_2576

Cheese:

Gruyere Quarter Wheel           $12.47

[From Wikipedia] Gruyère is sweet but slightly salty, with a flavor that varies widely with age. It is often described as creamy and nutty when young, becoming with age more assertive, earthy and complex. When fully aged (five months to a year) it tends to have small cracks which impart a slightly grainy texture.

IMG_2577

Wine Review-

Well this was not a good wine. In fact I had less than half a glass. I couldn’t stomach it at all. The flavor was not at all to my liking. I thought it was too bitter (and this from a girl who likes dry wine) and it caused my gag reflex to act up. Of course that is with the addition of the cheese which was grainy and nasty. More on that in the cheese review.

So that’s me. My husband, however, liked it. He thought it paired splendidly with the cheese and he found the flavor pleasing and not bitter at all. He couldn’t understand my issue with the wine. Husband gives it thumbs up. I give it thumbs down. I suppose it is up to you to decide.

We will both agree that this wine didn’t have any of the tasting notes the wine maker says it does. We didn’t get that at all.

Cheese Review-

What is there to say, it’s Gruyere. I find I’m not overly found of gruyere anything. I don’t usually eat much of the cheese but I do try them. So I tried it and it’s just as disgusting as I remember from our last red wine and gruyere experience.

Husband, of course, disagrees. He ate the cheese up. He does tend to like cheese. He said the flavor improved as he got closer to the center of the cheese hunk. I declined to test his theory

2015 Sunken Corn Hugel results

2015 Sunken Corn Hugel Results

The majority of the corn has been harvested and it is……interesting, to say the least. I planted painted mountain corn and yellow sweet corn in mounds in the sunken hugel. The mounds were surrounded by green beans which grew like crazy. They’ve all been harvested already. The corn is different. The color variety in the painted mountain corn is pretty extreme as you can tell in the above picture. More interesting is the intermixing between the two corn varieties I planted.

IMG_2608 IMG_2609

These SHOULD have been yellow sweet corn. The yellow sweet corn is odd in oh so many ways. For one, the kerneling is crazy bad.

IMG_2612

And secondly because some of it was colored. Just weird.

IMG_2602

The painted mountain corn didn’t avoid the weird kerneling but it is a lot more uniform.

I’ve decided to dry all of the corn for seed next year. I’m impressed with it’s hardiness as corn is notoriously hard to grow here (thanks wind). It will make a beautiful display hanging from the pot rack!

IMG_2606